
Categories
© 2021 CarLessOhio.org. All rights reserved.
Promoting the bicycling lifestyle in The Buckeye State
A couple of months ago, I came across some videos from a YouTube star in the backpacking/through-hiking world known as Darwin onthetrail. He occasionally does bicycle touring, and most of the advice he gives and gear he talks about apply equally to bike touring (or bikepacking) as well as hiking.
I had never heard of the concept of “cold soaking” food until I saw Darwin mention it in a couple of his videos. Typically, backpackers and bikepackers carry a stove, fuel, and cooking pot for boiling water to prepare dehydrated food. What you can do instead is put your food with some water in a container a few hours before you plan to eat it. The time allows the food to soak up the water and be reconstituted just as well as when it’s heated and/or boiled. This saves the weight of the stove and fuel in your kit, plus saves time when you get to your camp site and are ready to eat.
I decided to test this out for myself during today’s ride. My route was a nice loop that connects four bike trails: the Ohio & Erie Canal Towpath Trail (in the Cuyahoga Valley National Park and the Summit Metro Parks), the Freedom Trail connecting Akron to Tallmadge to Kent, the Portage Hike & Bike Trail, and the Summit Metro Parks Bike & Hike Trail.
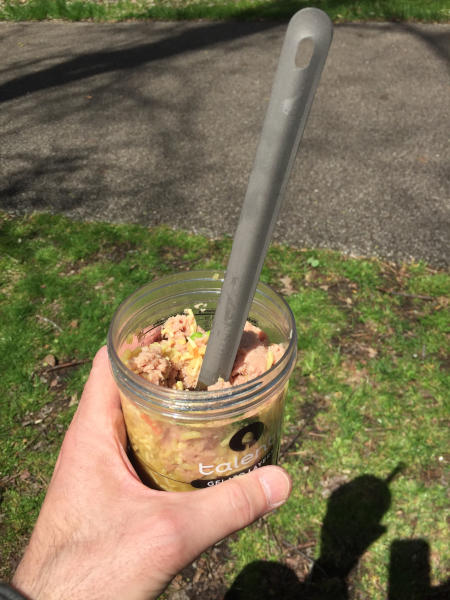
I re-used a container from Talenti Gelato, which is recommended by Darwin, and apparently is a popular option among many other cold soaking enthusiasts. I poured in the contents of a Knorr’s Rice Sides packet, and planned to add a packet of StarKist Tuna. I don’t think the Talenti container is big enough for this particular combination. The Knorr’s instructions on the packet said to use 1¾ cups of water for stove-top cooking, or 2 cups for microwave cooking. I could only fit about 1½ cups of water in the container with the rice mix before it started to get precariously full. I screwed the lid on tight, and gave it some shaking to try to distribute the water throughout the rice mix, but it seemed like the water was already starting to get so soaked up that there wasn’t much distribution going on. The vegetable pieces and powdered seasoning pretty much stayed near the top of the container.
I wasn’t sure how well the lid would hold up under the rigors of being in a bike frame bag (especially with the bumpy conditions on the Towpath Trail due to recent construction work), so I stuck it inside of a plastic resealable bag just in case.

This fit nicely inside of my new Oveja Negra Superwedgie Frame Bag (thanks, Mom!), along with my spoon, cable lock, and garage door opener, with room to spare.

During the ride, I came across a nice, secluded bench on the Portage Hike & Bike Trail, and decided that would make a good lunch spot. I took out my food container and dug in. The lid held up fine; there was no mess in the plastic bag.

After eating about a third of the rice mix, there was enough room for me to stir in the tuna.
So, the 64-dollar question, of course, is, “How was it?” Surprisingly good, I must say. The consistency of the rice mix and the taste were the same as what I’d expect if they were prepared the traditional way with boiling water. My fears about the ingredients not being able to mix up well enough were unfounded. As I ate, I did not notice any pockets of “no taste” or “too much taste.” The rice soaked up the water well. I would not have wanted to use any less water, as overall, it was just on the good side of “moist enough” to eat.
If I were eating this in the comfort of home, I would probably be thinking, “This is kinda gross.” That’s probably the case with most camp food, though. At this point, I had been on my bike for 3½ hours, and it had been 5½ hours since I had eaten anything at all, so this meal seemed like a gourmet smorgasbord. I’d probably be finding myself in much the same situation any time I used this food preparation method, so I expect I’d feel much the same way every time.
For quality and convenience, I give the concept of cold soaking two thumbs up, and it goes without saying that it fulfills the goal of weight savings. The only downside would be getting used to eating your dinners cold.
If I do cold soaking in the future, I’d likely look for a larger container. Peanut butter jars come highly recommended, or if money is no object, the Vargo Titanium Bot HD would be my first choice. A Hydro Flask 18-ounce Food Flask would probably make a good budget-friendly choice if you’re not into re-using containers from store-bought foods (although it’s a pretty heavy option).
Backpacking stoves and cookware are so small and light these days that for multi-day trips, I’d still stick with traditional cooking methods. The extra stuff to carry is worth it for me to have a hot meal at the end of the day, not to mention hot coffee for breakfast.
Where I’ll likely use cold soaking is impromptu one-night trips, where maybe I don’t have the time to plan my packing list very well, or don’t have the time to set up my bike to carry more than bare minimalist gear. Or, if I anticipate feeling lazy once I get to the camp site. Another situation where I see a big advantage to cold soaking would be an event such as a multi-day self-supported race, where time, in addition to weight, is a big factor.
I don’t usually make New Year’s resolutions, but as my riding mileage dropped way off last month with the onset of bitter cold weather, I figured the new year would be a good excuse to start walking the walk, as well as talking the talk, especially as a co-founder of this blog. So, I began riding my bike to work yesterday.
The worst part about bad-weather riding, in my opinion, is not so much being out in the weather itself. It’s the additional activity required before and after the ride: planning the additional clothing that you need to wear for the ride, and packing more clothes that you’ll have to change into once you arrive at your destination. So, advance preparation is the key more than ever to killing the motivation-killers. Get into a night-before routine–set out your riding clothes, pack your at-work clothes, and make sure your bike and gear are set up and ready to go.
Speaking of bike preparation, I recently added the final touch to make my winter commuting bike ready for action. I needed a rear cargo rack. Mountain bike frames with disc brakes and no rack mounting eyelets present a challenge for carrying cargo. First, I tried mounting a standard cargo rack using clamps around the seatstays for the lower arms of the rack. It held firm, but this caused the rack to sit in a more forward position, which in turn caused my heels to hit whenever any pannier was hanging on the rack.
So, I came across the Axiom Odysee Full Suspension Rack. As the name implies, this rack will work on full-suspension mountain bikes (as long as they don’t have suspension pivots on the seatstays). However, it’s the ideal solution for any bike that has disc brakes and/or lack of rack eyelets. Your rear wheel must have a standard quick release. The design principle is similar to the popular racks from Old Man Mountain, but the price is much more reasonable.
The lower mounting points on the Odyssee Full Suspension Rack use elongated metal plates, with holes through which you thread your rear quick release skewer. The upper mounting points on the rack are made up of two rigid metal support brackets and a pair of clamps that attach to any point on your seatstays. The support brackets are adjustable, so you can get a level rack setup no matter what the angle of your seatstays is.
 Here’s what it looks like on my bike. It was an unexpected benefit that it still left room for my seatpost-mounted fender between the rack and the tire. My Axiom waterproof panniers fit very well, as you would hope, leaving plenty of clearance for my size-10.5 hush puppies.
I have never seen any store carry the Axiom Odyssee Full Suspension Rack, but most can special-order it for you. Ask for QBP item number RK6622; they’ll know what you mean. Suggested retail price is $46.99, which includes all the brackets, clamps, and other hardware you’ll need to make it work, and comes in any color you want, as long as it’s black.
Last Monday, after much deliberation, I ordered some Schwalbe Marathon Winter studded snow tires for my bike. I’ve always just used wide knobby mountain bike tires, and I figured if I was going to commute through the winter, I would need them. I was unsure if I did the right thing by ordering the tires, then on Tuesday I wiped out in the parking lot at work in front of my boss. I did the right thing! Fast forward one week, I was eagerly waiting for the tires to arrive. UPS came and went; no tires. Well, I ended up staying later because other scheduled plans later this week, and luckily I did; the tires arrived FedEx!

Of course, I immediately installed the tires. Let me start off by saying that I am a big fan of fat tires and these are not. They are 26″x1.75″, and most companies’ tires run narrow. I used a digital caliper to accurately measure them and much to my surprise, the came out to a whopping 1.77″.
After work I had to run some errands, so I was more than happy to try out the new tires. I had a 3 mile ride to my stop, 2 of which were uphill. The tires were pretty noisy, which I figured they would be, since there was a couple hundred steel studs hitting the ground, but they still rolled pretty smoothly. At this point, the roads were dry. Schwalbe recommends that on dry pavement you run maximum pressure, which is 70 psi, and when it’s icy, run minimum air pressure, which is 30 psi. They also suggest 20 to 40 miles of hardpack riding to set the studs firmly in the tire. After my errand, I headed home, and I had about 8 miles to go. A mile into the ride the wind started to blow and the rain started; after another couple miles the rain tuned to sleet, which felt like I was getting sandblasted. By the time I started to descend back into the valley, I was in a ful-on Ohio winter mess. Snow was accumulating on the road, the wind was blasting, and all this over ice. Got to love winter commuting in Ohio! The descent back home wasn’t even fun; I had to ride the brakes (thank you disc brakes), then I was worried that the cars around me were going to lose control and crush me. Finally, I arrived home in one piece, and you know what? The tires never lost traction. I made a wise choice!

 Here are a couple of shots of the bike I put together for winter commuting; click on the photos to open the full-sized image in a new window.
It’s based on a Diamondback Zetec Comp mountain bike that I originally bought back in early 2001. Since I’ll mostly be using this bike on the road or bike paths, the suspension fork is not really necessary, but it’s the only fork I had around to use.
Features and components that make it a build more suited to winter riding are:
 For the single speed drive train, I used a Surly Singleator chain tensioner and a bunch of generic plastic cassette spacers to convert my 9-speed rear hub. I’m using a 44-tooth chainring up front, and a 20-tooth cog. That gives me the gearing that I think will be best for road riding in winter conditions; not quite as high a gear as my singlespeed road bike (42×16), but much higher gearing than you’d typically see on a singlespeed mountain bike used for actual off-road riding (e.g. 32×18).
 I’m using Crank Brothers Mallet pedals. All of their models have a cleat retention system that continues working well in mud and snow; the Mallet has a large platform that will be good if I want to use them as regular platform pedals with non-cycling shoes, such as warm winter boots.
The handlebar is called the Space Bar, from a company called Origin. It’s got an ergonomic bend to give your hands a more comfortable position, while keeping them at the same distance from your body, so you don’t have to change the length of your stem if you swap this handlebar onto your current bike. I’m trying this bar out, and am not sure if I’m sold on it yet. The one downside I see so far is that with all of the bends, it doesn’t leave you room to mount accessories, such as lights, bells, etc. (notice I used a stem-mounted computer). I tried using this bar on a geared bike previously, and it was a tight squeeze trying to get the grips, brake levers, and shifters all to fit, so it’s ideal for use on a singlespeed, where you only have to worry about your grips and brake levers.
 Speaking of the computer, I used the CatEye Micro Wireless, again just because it was a spare one that I happened to have around. I’ve used this computer for a couple of years, and it’s worked flawlessly. When I set it up on this bike, it worked great in the garage, but when I was out on the road, the transmitter conked out on me (and the battery is relatively fresh). I’m guessing the cold air affected it; maybe if I move the magnet and transmitter up higher on the fork leg, I’ll have better luck.
One addition that I need to find is a front fender that can mount in the steerer tube of the front fork. Notice I’m using a seatpost-mounted rear fender. This kind of fender does not provide as good of protection from the muck as a full-coverage fender, but for a winter bike, full-coverage fenders might be a problem, as they’d provide another place for snow and ice to build up.
